

Most dated kitchens do not need brand-new cabinetry. These ideas for updating kitchen cabinets work when the cabinet boxes are still solid, the layout mostly works, and the problem is finish, style, or storage rather than structural failure.
Quick answer: the best ways to update kitchen cabinets without replacing them
You can update old cabinets without replacing them if the boxes are square, dry, and structurally sound. The best paths are paint, refinishing, refacing, replacing only doors and drawer fronts, new hardware, added trim, glass inserts, under-cabinet lighting, cabinet-to-ceiling extensions, upgraded end panels, soft-close hardware, and interior storage retrofits. That gives you 12 practical update methods .
Painting gives the biggest style change for the lowest entry cost when surfaces can be prepped properly. Refinishing is better when the wood is worth preserving. Refacing suits kitchens where the boxes are good but the door style feels dated. New doors and drawer fronts sit in the middle. Full replacement is smarter when cabinets are swollen, warped, badly damaged, or the layout wastes space.
Professional help usually matters most when you want a smooth painted finish, tight reveal lines, aligned doors, custom trim, or a cabinet refresh that has to work with new counters, backsplash, and flooring. In Toronto kitchens, that design coordination often makes the difference between a quick cosmetic update and a kitchen that looks intentionally renovated.
How to choose the right cabinet update method
The right method depends first on cabinet condition, then on material, then on how far you want the look to move. If the boxes are solid and the layout works, cosmetic cabinet remodel ideas usually make sense. If the boxes are failing, replacement becomes the more sensible path.
A simple decision tree
Use paint, hardware, trim, and lighting when the cabinets function well and only the style feels old. Use refinishing when you have real wood with a worn finish and the grain still adds value. Use new doors, drawer fronts, or full refacing when the cabinet boxes are fine but raised-panel doors, arches, or heavy profiles date the kitchen. Choose replacement when you see water swelling, delamination, major warping, broken cabinet sides, failing drawer systems, or a layout that fights how you cook.
By cabinet condition
Choose a light update when the issues are surface-level. That means faded stain, yellowed white paint, dated hardware, plain end panels, awkward crown details, or poor interior storage.
Choose a mid-level update when the structure is fine but the visual language is wrong. That includes bulky oak doors, builder-grade flat sides, short upper cabinets, and exposed gaps above cabinets.
Choose replacement when the problems are fundamental. Cabinets are usually too far gone when the boxes are out of square, water-damaged, sagging, delaminating, or the kitchen needs layout changes for appliances, workflow, or more useful storage.
By cabinet material
Oak can be painted, stained, or toned, but its open grain stays visible unless the grain is filled. Laminate can sometimes be painted, but adhesion is the main risk and prep has to be exact. Melamine has similar bonding limits, so durability depends heavily on surface preparation and realistic use expectations. MDF paints well because the face is smooth, but edges and moisture exposure are the weak points.
Builder-grade cabinets can look much better with the right upgrades, but cosmetic work cannot turn poor proportions into true custom joinery. Better doors, panels, fillers, hardware scale, and lighting can move the look substantially, yet a weak layout still feels weak after the finish work is done.
Paint vs refinish vs reface vs new doors vs replace: which is best?
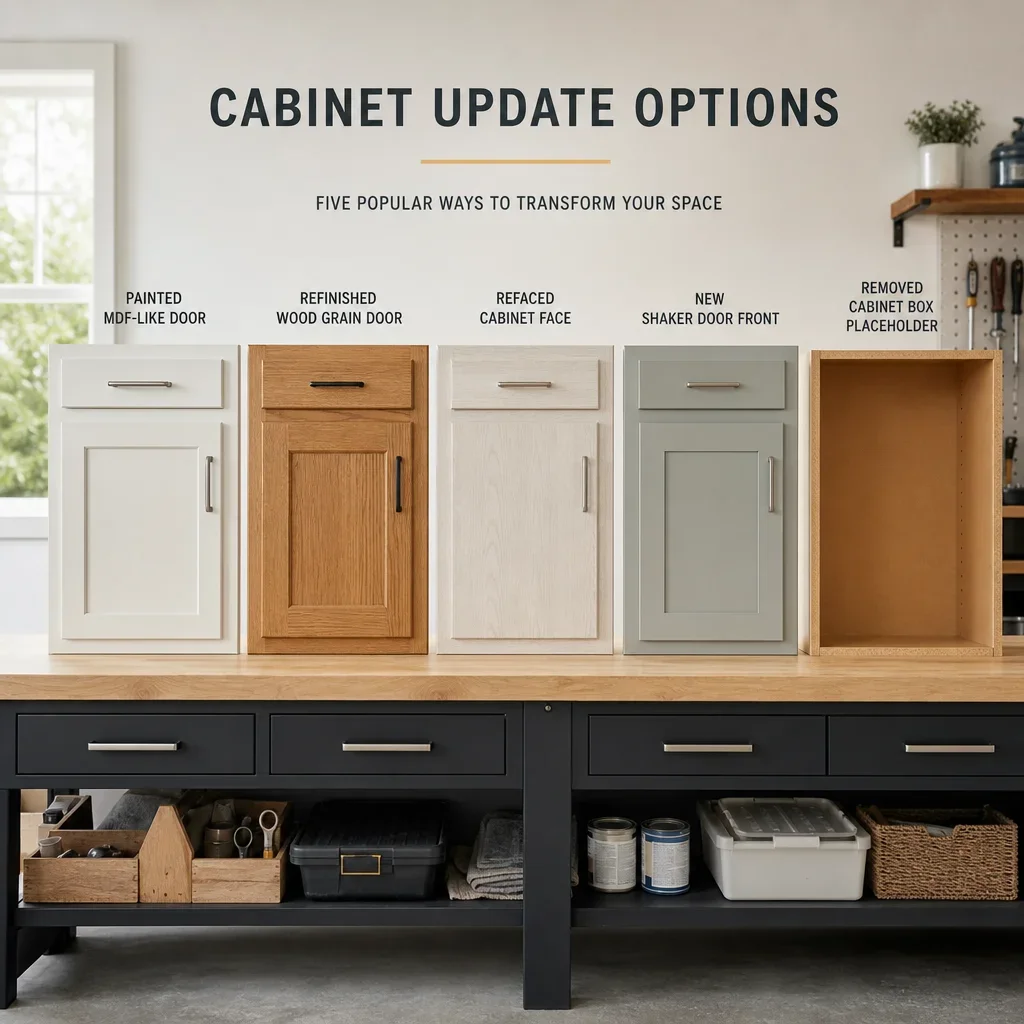
The best method is the one that matches the cabinet material, box condition, and how much visual change you want. Paint changes colour and style fastest. Refinishing keeps real wood. Refacing changes visible surfaces more completely. New doors are a focused middle path. Replacement fixes layout and function as well as appearance.
| Method | Best for | Appearance change | Durability | Disruption | DIY difficulty | Cost level | When to avoid |
|---|---|---|---|---|---|---|---|
| Paint | Solid boxes, major colour change | High | Medium to high if prepped well | Medium | High | Low to medium | Slippery laminate, failing surfaces, moisture damage |
| Refinish | Real wood worth saving | Medium | High when finish system suits wood | Medium | High | Medium | Veneer failure, heavy damage, wrong wood tone goal |
| Reface | Good boxes, dated style | High | Medium to high | Medium to high | Low for DIY, better as a pro job | Medium to high | Bad boxes, bad layout |
| New doors and drawer fronts | Good boxes, outdated fronts | High on the visible face | Medium to high | Medium | Medium to high | Medium | Mismatched box finish, damaged frames |
| Replace | Poor layout or failing cabinets | Complete | High | High | Not realistic for most DIY | High | Boxes are still good and the problem is only cosmetic |
Refinishing is usually cheaper than buying all-new cabinets because you keep the cabinet boxes, keep most of the layout, and avoid the larger ripple costs that come with replacement. Those ripple costs often include countertops, backsplash repairs, flooring patching, electrical changes, and drywall work, even when the original goal was only a cabinet refresh.
The best way to refinish kitchen cabinets is to start with a surface and species check, then strip or sand as needed, repair defects, and apply a finish system suited to the existing wood and topcoat. Staining over already stained cabinets can work in some cases, but not predictably over every existing finish. If the old topcoat blocks penetration or the new colour needs a major shift, stripping or heavy sanding is usually required for a controlled result.
25 cabinet makeover ideas to modernize a kitchen
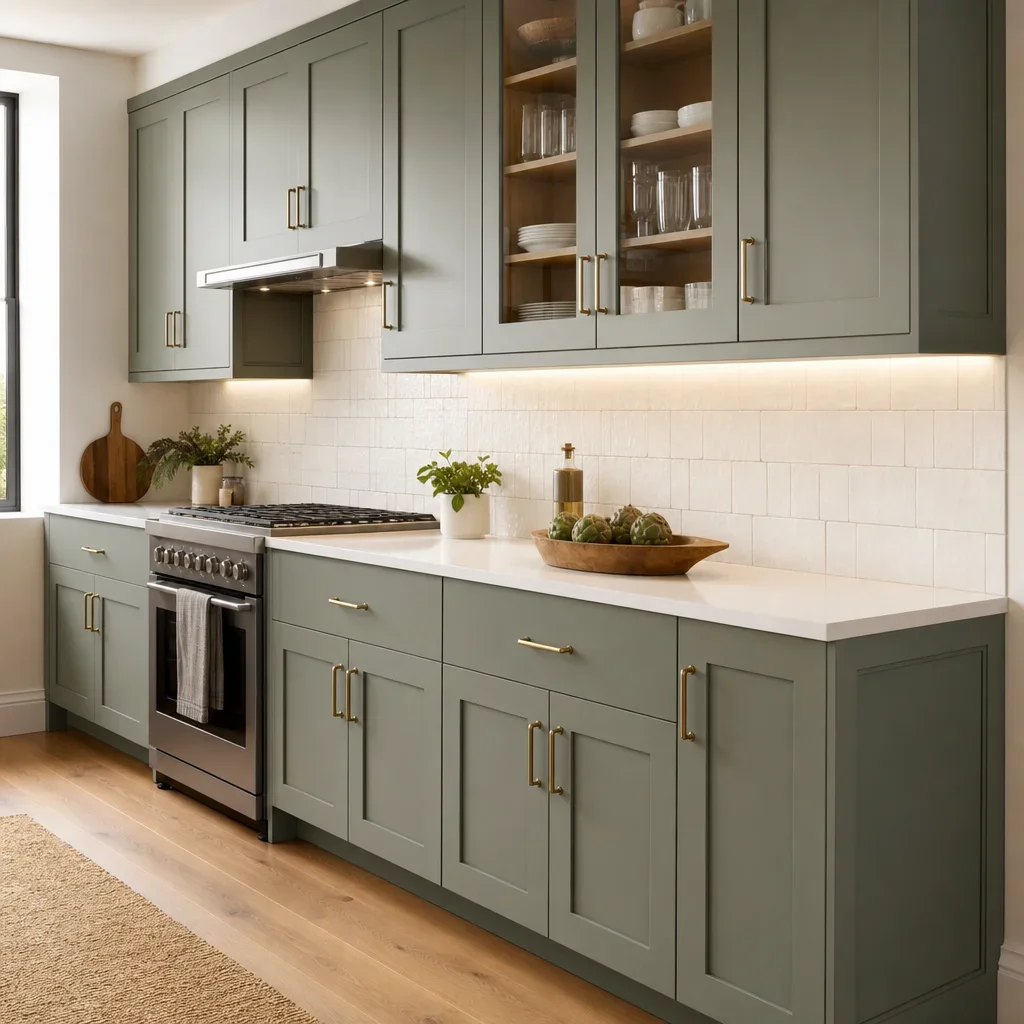
The best cabinet makeover ideas start with easy visual gains, then move into deeper changes only where the kitchen will benefit. That keeps the budget focused and avoids replacing good material just because the style feels tired.
- Replace old knobs and pulls with simpler hardware. This is the fastest visible update and suits almost every cabinet material.
- Change hardware placement for a more current look. Taller doors often look better with longer pulls placed consistently across the run.
- Paint the cabinets in one grounded, modern colour. Warm whites, soft taupes, muted greens, and deep blue-greys all read more current than stark yellowed finishes.
- Use two-tone painted kitchen cabinet ideas. Darker lowers with lighter uppers can visually anchor the room without making it feel heavy.
- Refinish real wood instead of painting it. Good wood often looks richer with a fresh stain and clear coat than with an opaque coating.
- Tone down orange oak rather than erase it completely. A quieter stain direction can make older oak feel architectural instead of dated.
- Replace only cabinet doors and drawer fronts. This gives you a style shift without removing every cabinet box.
- Swap raised-panel fronts for Shaker or slab profiles. That one move can modernize the whole kitchen.
- Add crown molding or a ceiling extension above uppers. Taller-looking cabinets reduce the unfinished gap at the top.
- Add a light rail under uppers. It hides LED strips and gives upper cabinets a more finished edge.
- Install under-cabinet LED lighting. Better task lighting makes the kitchen look more expensive and work better.
- Add flat stock trim to plain fronts. This is one of the most effective kitchen cabinet redo ideas for builder-grade boxes.
- Upgrade exposed cabinet ends with finished panels. Finished sides make a run look designed, not assembled.
- Improve the toe-kick with furniture-style detailing where the kitchen style supports it. This suits more classic or transitional spaces.
- Add glass inserts to a few upper doors. Selective use keeps the kitchen open without turning storage into display pressure.
- Use reeded or textured glass for a softer look. It conceals clutter better than clear glass.
- Remove a few doors to create open shelving zones. This works best in one controlled area, not across the whole kitchen.
- Add beadboard, cane, or other decorative panel inserts selectively. Small doses feel designed; too much can look themed.
- Refresh cabinet interiors with liners, paint, or better shelf finishing where appropriate. A makeover should not stop at the doors.
- Add pull-outs, tray dividers, spice storage, or waste sorting. Function upgrades often deliver more daily value than colour alone.
- Upgrade hinges to soft-close where possible. It improves feel immediately and helps older kitchens feel newer.
- Rework one feature zone, like a coffee station or pantry bank. A focused update can lift the whole room.
- Pair cabinet updates with a backsplash or countertop change. Coordination is what makes a refresh look complete.
- Add interior or glass-cabinet lighting in selected areas. Light adds depth and a more custom look.
- Stop updating and replace instead when the boxes are failing or the layout is wrong. Cosmetic work cannot correct bad planning.
Best ideas by cabinet material: oak, laminate, melamine, and MDF
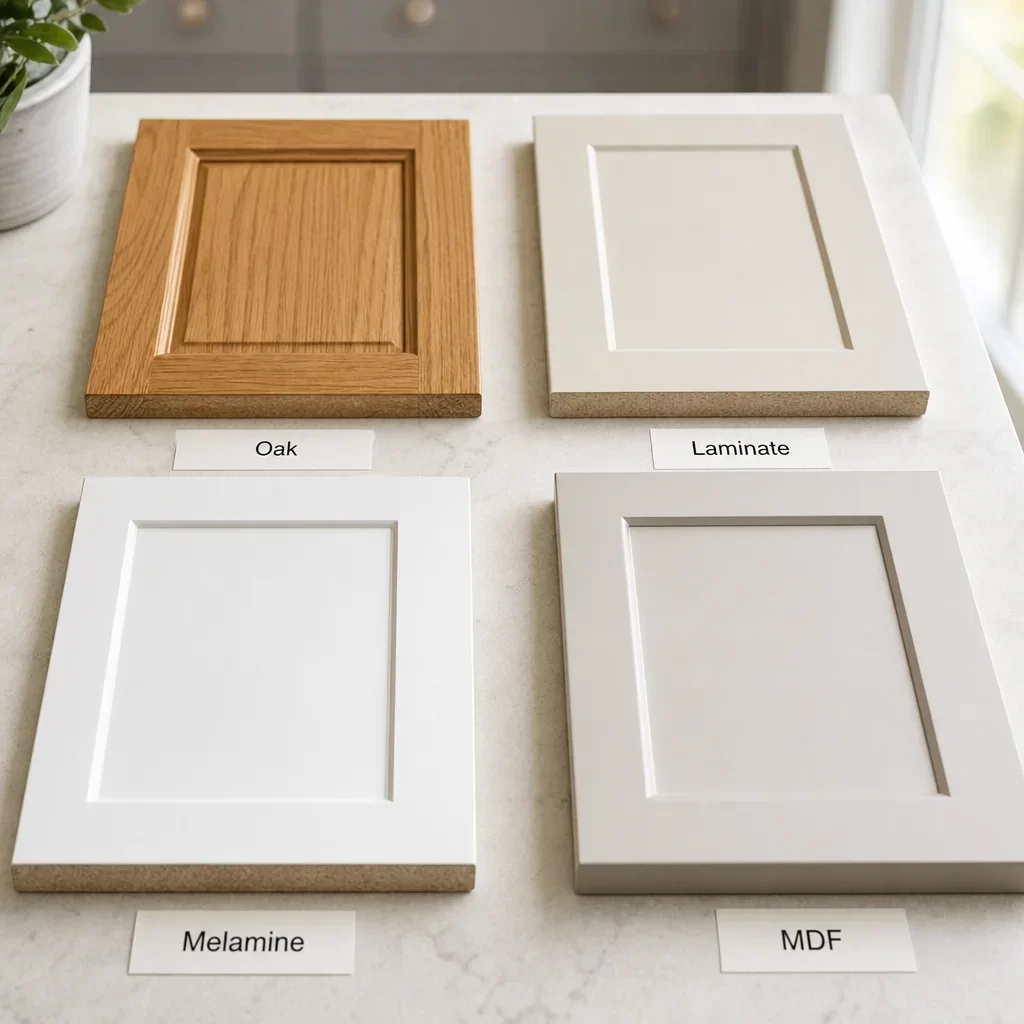
Material should drive your update path because not all cabinet surfaces accept paint, stain, or wear in the same way. This is where many DIY plans go wrong.
Oak cabinets
Oak can be modernized, but you have to decide whether to celebrate the grain or hide it. If you paint oak, expect visible grain unless you use a grain-filling process. If you keep it natural, a toned stain, cleaner hardware, flatter backsplash, and better lighting can make oak cabinets look modern without pretending they are maple or MDF.
Laminate cabinets
Laminate can sometimes be updated without replacement, but it is not as forgiving as wood. How to update laminate kitchen cabinets without replacing them starts with honest condition checks: lifting edges, chips, and worn corners weaken the case for paint. When the surface is intact, careful cleaning, scuffing as appropriate, and a compatible bonding system matter more than the colour choice.
Melamine cabinets
Melamine behaves similarly to laminate because the surface is slick and less porous than wood or MDF. That means paint adhesion is the main concern, not just appearance. Melamine can be refreshed, but it is usually better for moderate-use kitchens or projects where the homeowner accepts that cosmetic coatings may not wear like a factory finish.
MDF cabinets
MDF is often the friendliest surface for a painted look because the faces are smooth and there is no wood grain telegraphing through the finish. The caution is moisture and edge damage. Swollen edges, crumbling screw holds, or repeated sink-area exposure can make replacement smarter than another cosmetic cycle.
Painted cabinet ideas: colours, finishes, and what looks current
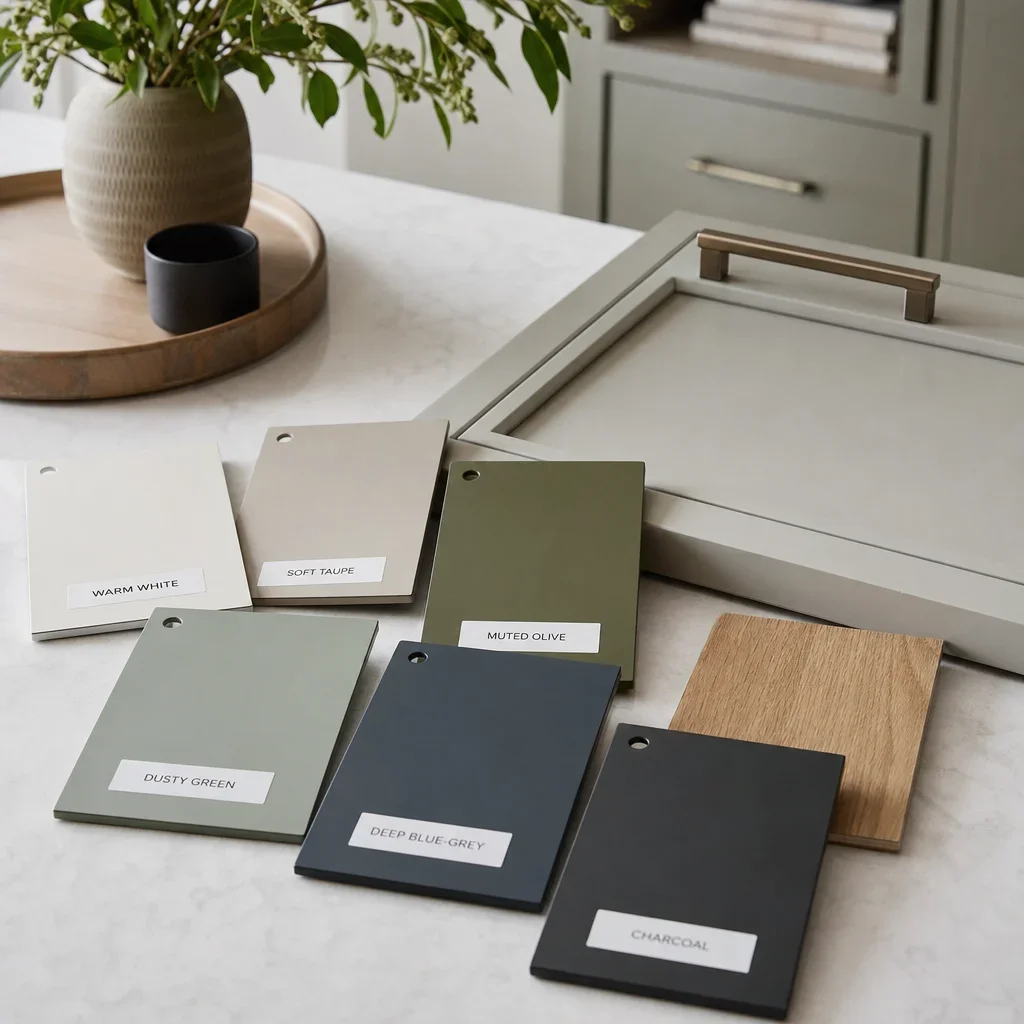
Current cabinet colours are moving warmer and softer, not colder and sharper. Good directions for 2026-style kitchens include warm white, soft taupe, greige, muted olive, dusty green, deep blue-grey, charcoal accents, and mixed natural wood with painted cabinetry. That gives you 8 colour directions to work from .
What cabinet colour is outdated usually has more to do with context than a universal ban. Very yellow creams, harsh cool greys, and oversaturated trend colours can feel more dated when the counters, backsplash, flooring, and lighting all belong to a different design period.
Two-tone painted kitchen cabinet ideas work best when there is a clear reason for the contrast. Darker lowers ground the room, lighter uppers keep it open, and a contrasting island can become the focal point without breaking the whole kitchen into fragments.
Finish sheen affects both maintenance and how imperfections read. Lower sheens hide surface flaws better, while higher sheens wipe more easily but show brush marks, dents, and patching more quickly. In cabinet painting, the right sheen is as much about the substrate and finish quality as the colour itself.
Painting kitchen cabinets ideas before and after look strongest when the new colour relates to fixed finishes. Countertop undertone, backsplash scale, floor colour, and natural light should all influence the cabinet decision, especially in Toronto homes where daylight can vary sharply between narrow semis, condos, and larger detached kitchens.
How to make builder-grade cabinets look custom
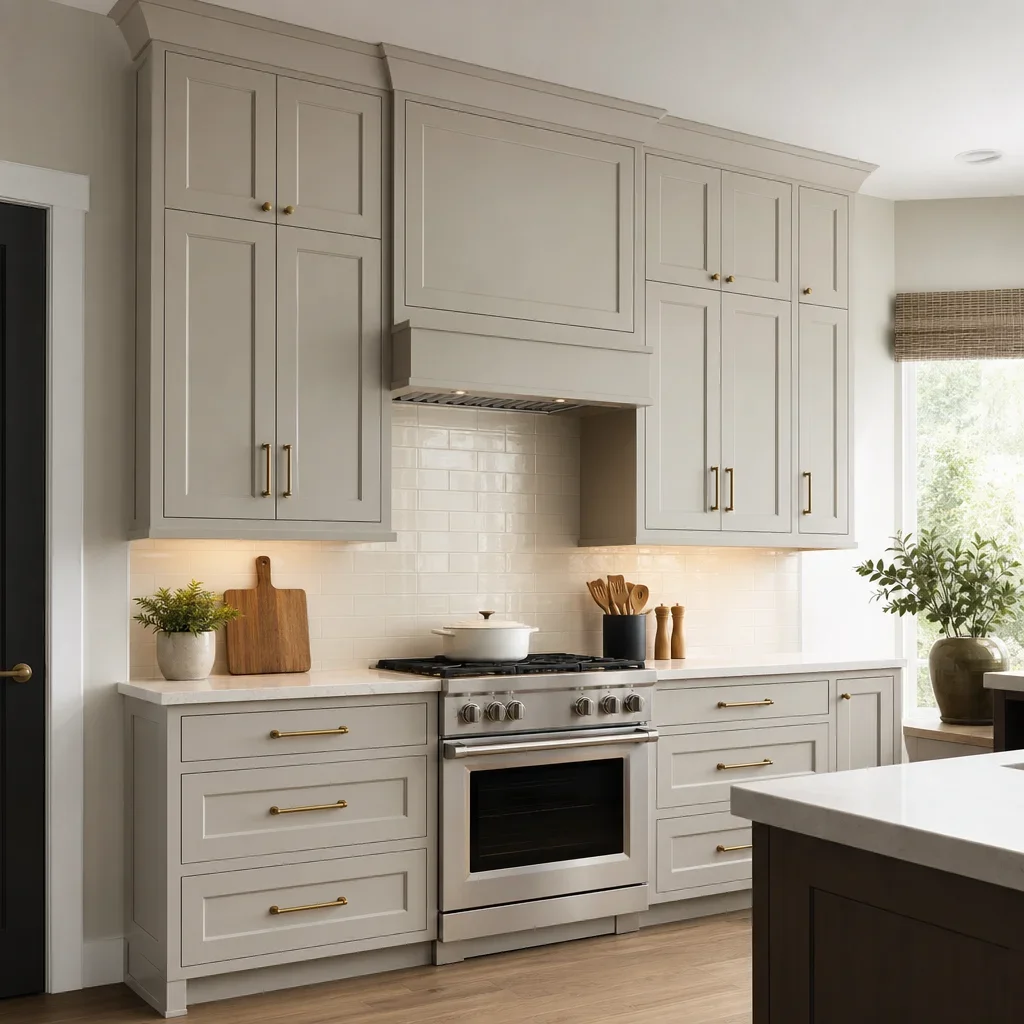
Builder-grade cabinets look more custom when you improve proportion, symmetry, and finish detail rather than relying on paint alone. Taller crown, ceiling extensions, larger hardware, finished end panels, cleaner filler pieces, and better alignment all help.
Cabinet extensions that reduce the dead zone above upper cabinets make the room feel more architectural. Even when the cabinet boxes stay in place, taking the visual line higher can change the whole kitchen.
Matching end panels and hidden exposed sides matter because unfinished cabinet ends are one of the biggest giveaways of a basic installation. Once those visible sides are upgraded, the whole run reads more intentionally.
Functional inserts also help cabinets feel custom, not just look custom. Pull-outs, tray dividers, waste sorting, and deep-drawer organization turn plain cabinetry into something that behaves more like a tailored kitchen.
Prep, painting, and refinishing basics: what homeowners should know before starting
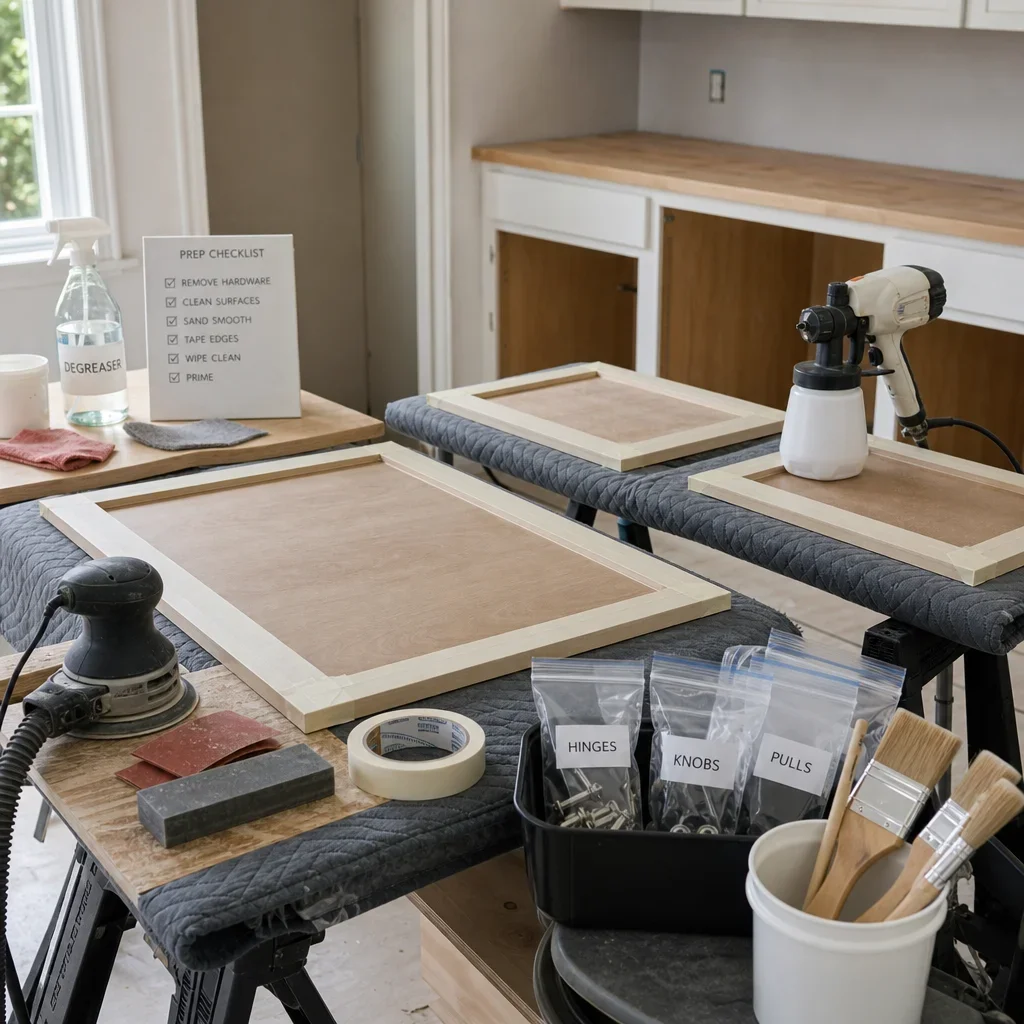
Cabinet paint and finish failures usually start in prep, not in the colour coat. A professional sequence is cleaning, degreasing, removing hardware, labelling doors, surface prep, repairs, priming where required, then finish coats and cure time suited to the product system.
Painting kitchen cabinets for beginners sounds simple, but cabinet surfaces see grease, hand oils, moisture, and repeated impact. That is why poor cleaning, rushed sanding, skipped repairs, wrong primer choice, and using the doors too soon are common reasons the finish chips or sticks.
How to paint kitchen cabinets professionally is less about a secret paint and more about process control. Smooth results come from door removal, hinge adjustment, dust control, consistent prep, patient recoat timing, and a finish method that leaves fewer lap marks and brush ridges.
Murphy’s Oil Soap is not a universal prep solution for every cabinet refinishing job. On wood cabinets it may be fine as a routine cleaner in some cases, but any product that leaves residue can interfere with adhesion, so prep should follow the finish system requirements rather than internet habit.
Staining over already stained cabinets is possible only when the existing finish and the target look allow it. If the current coating blocks absorption or the colour shift is dramatic, stripping or substantial sanding is usually the more predictable route.
What many homeowners wish they knew before painting cabinets is that cure time and handling matter as much as application day. Doors can feel dry before the finish is truly hardened, so reassembly and heavy use too early can mark an otherwise good job.
Updating cabinet doors, hardware, trim, glass, and lighting
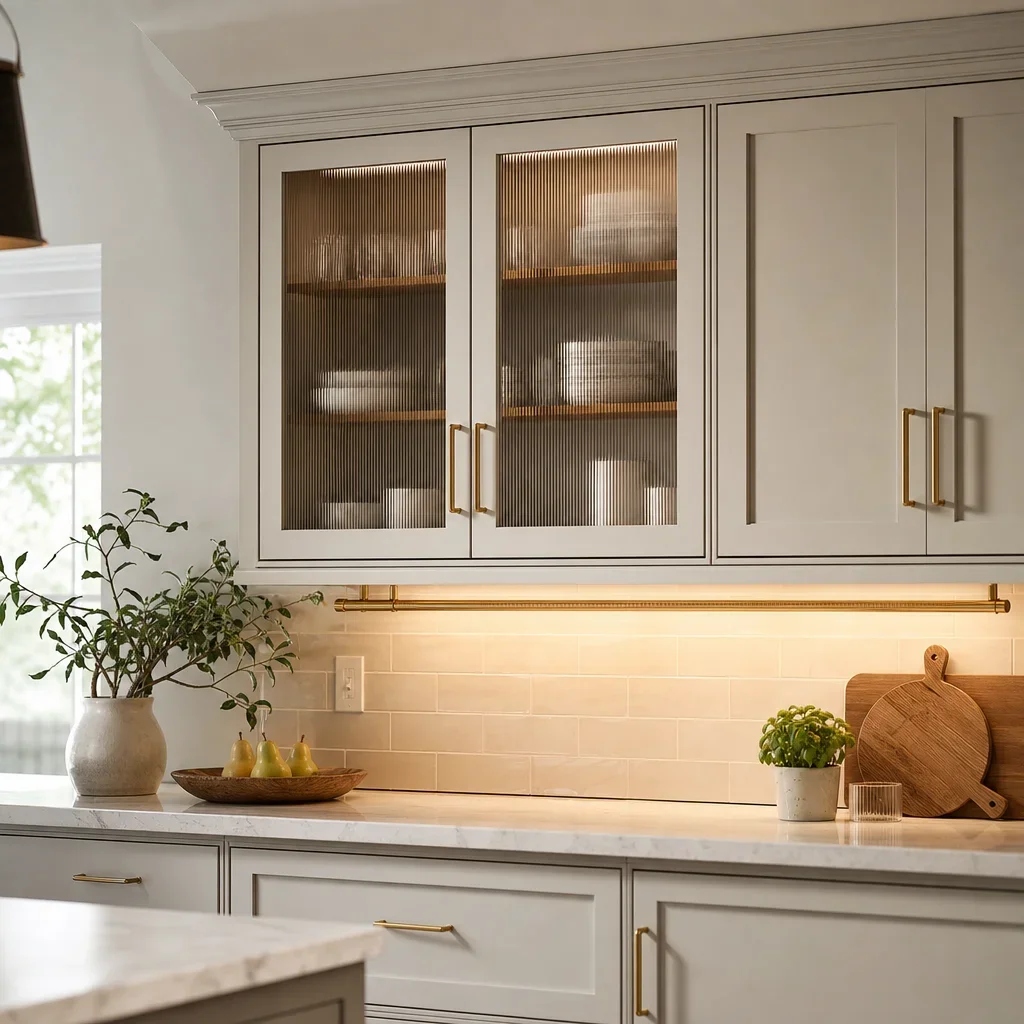
Door and drawer-front updates give you a major visual change without tearing out every cabinet box. That is why they sit near the top of the list for kitchen cabinet upgrades that balance impact and restraint.
Applied molding can turn a plain slab or flat front into something more detailed, but the proportions have to suit the kitchen. Too much trim on a small or modern kitchen often makes the cabinets feel heavier, not better.
The latest trend in cabinet knobs and pulls is a broader move toward simpler, tactile hardware with cleaner lines. Streamlined bar pulls, restrained knobs, warm metallic finishes, and black used selectively all fit this direction better than highly ornate pieces.
Trim details like crown, light rails, valances, end panels, and toe-kick finishing do more than decorate. They hide transitions, improve visual weight, and connect the cabinetry to the rest of the room.
Glass inserts work best in selective upper cabinets where you can control what shows through. Reeded, frosted, or textured glass gives a premium look while hiding more visual clutter than clear glass.
Lighting is one of the highest-return cabinet upgrades because it improves both function and atmosphere. Under-cabinet LEDs brighten prep areas, while interior cabinet lighting can make glass-front sections feel more intentional and custom.
Don’t ignore the inside: organization, layout, and accessibility upgrades
A kitchen feels newer when the cabinets work better, not just when they look better. Pull-outs, tray dividers, recycling centres, spice storage, lazy Susans, and pantry retrofits can change everyday use without moving a single wall.
Organizing by zone usually works better than arranging by cabinet size alone. Prep tools near the main counter, cooking items near the range, cleanup supplies near the sink, and serving ware near the table path make the kitchen easier to use.
Accessibility upgrades matter in older homes and for long-term planning. Soft-close hardware, lower pull-outs, easier-reach shelving, and full-extension drawer systems improve use without forcing a full remodel.
Layout planning should follow workflow, appliance placement, and what you reach for every day. If the kitchen has a fundamentally poor layout, cosmetic cabinet updates may improve the look but still leave the room frustrating to use.
When cabinet updates make sense, and when a full kitchen remodel is smarter
Cabinet updates make sense when the layout works, the boxes are solid, and the goal is better style with moderate function gains. That is often the right answer for homeowners weighing how to update old kitchen cabinets without replacing them.
A full remodel is smarter when the room needs more than a surface fix. If storage is poor, appliance locations are awkward, traffic flow is bad, or several finishes are failing at once, replacement often becomes the more coherent investment.
There is no honest Toronto-wide answer to whether a $30,000 kitchen remodel is enough without defining the scope first. Budget capacity changes dramatically with cabinetry level, layout changes, electrical work, plumbing moves, counters, flooring, and appliance allowance. In practice, cabinetry and labour are usually among the biggest cost drivers, and structural or mechanical changes can push a project well beyond a cosmetic refresh.
The most expensive part of a kitchen remodel is often the cabinetry package or the labour tied to layout and construction changes. Once you add stone counters, electrical upgrades, plumbing revisions, flooring, tile, and finish carpentry, the cabinet decision affects almost every other line item.
If you are deciding between a cabinet refresh and a larger kitchen renovation in Toronto, a design consultation can clarify what your existing cabinets are worth saving and what should change for the kitchen to feel cohesive from concept to completion.
Before-and-after examples: what different cabinet update paths can achieve
A good before-and-after plan starts with what the kitchen already has going for it. The strongest results do not force every cabinet into the same solution.
In one common scenario, dated oak cabinets still have solid boxes and decent proportions. The best route is often toned wood refinishing, cleaner hardware, flatter backsplash, and warmer lighting, which keeps the character but removes the orange cast that dates the room.
In another scenario, builder-grade white or maple cabinets feel plain rather than damaged. Added trim, better end panels, larger hardware, under-cabinet lighting, and a stronger backsplash can push those cabinets toward a custom look without replacing the boxes.
A third scenario is the dark, closed-in kitchen with good cabinet structure but heavy door profiles and poor visual contrast. Painting or replacing the doors, adding a lighter backsplash, and improving task lighting can make the space feel materially newer without a full gut renovation.
A fourth scenario is the budget-conscious homeowner deciding between a cabinet makeover and a larger remodel. If the layout already works, targeted cabinet upgrades and finish coordination may be enough. If the storage and circulation fail daily, cosmetic work can become false economy.
FAQ about updating kitchen cabinets
How can I update my kitchen cabinets without replacing them?
The main options are paint, refinishing, refacing, replacing only doors and drawer fronts, new hardware, trim, lighting, glass inserts, and interior storage upgrades. The best choice depends on cabinet condition, material, and whether the layout already works.
What is the cheapest way to redo kitchen cabinets?
The cheapest path is usually a cosmetic update, not structural work. Hardware changes, selective paint, trim, and lighting upgrades typically cost less than new doors, refacing, or replacement because you keep the cabinet boxes and avoid bigger trade work.
Is it cheaper to refinish cabinets or buy new ones?
Refinishing is usually cheaper than buying new because you keep the existing boxes and avoid many related replacement costs. It makes the most sense when the cabinets are real wood and still structurally sound.
What is the best way to refinish kitchen cabinets?
The best refinishing process matches the wood species, current coating, and target colour. Proper cleaning, sanding or stripping, repairs, stain or topcoat selection, and controlled curing matter more than rushing to the final appearance.
Can I stain over already stained cabinets?
Sometimes, but not always. Existing topcoats, wood species, and the size of the colour change all affect whether a new stain will take evenly or whether stripping is required first.
How do I make oak kitchen cabinets look modern?
Reduce orange undertones, simplify hardware, update the backsplash, improve lighting, and decide whether to keep the grain visible or fill it before painting. Oak looks best when treated intentionally, not disguised halfway.
Can laminate kitchen cabinets be painted?
Sometimes, yes, if the laminate is intact and the prep and bonding system are right. Paint is a riskier path on laminate than on wood or MDF, so condition matters more here.
What color kitchen is in for 2026?
The direction is toward warmer, quieter colours and mixed-material kitchens. Warm whites, taupes, greiges, muted greens, deep blue-greys, and natural wood paired with painted cabinets all fit that movement.
What cabinet color is outdated?
No colour is automatically wrong, but very yellowed whites, harsh cool greys, and overly trendy saturated tones can date a kitchen faster when the rest of the finishes do not support them.
Is $30,000 enough for a kitchen remodel?
It can be enough for some scopes and far too low for others. Layout changes, cabinetry level, counters, electrical, plumbing, and flooring all change what that budget can realistically cover in the GTA.
What is the most expensive part of a kitchen remodel?
Cabinetry and labour are often the biggest cost centres, especially when the layout changes. Structural, electrical, and plumbing revisions can add heavily to that.
What is the 1 3 rule for cabinets?
There is no single universal cabinet standard called the 1 3 rule. The phrase is sometimes used loosely for design proportion guidance, but the meaning changes by source, so it is not a dependable rule to design from on its own.
A cabinet refresh works best when it solves the right problem. If your boxes are good, update them well. If the kitchen needs a better plan, treat the cabinets as part of the larger renovation, not as an isolated finish decision.


